Quilting for Baby Girl Quilt Made From Half Square Triangles
Half Square Triangles: Specialty Tools
by Karen Johnson
There are many specialty tools for making half foursquare triangles (HSTs). We'll testify yous how to use Fons & Porter's Half and Quarter Ruler by Omnigrid, the Wonder cutting Ruler, Brenda Henning's Triangulations software, and June Tailor'south Perfect Half and Quarter Square Ruler. There's a skillful risk you have one of these hiding out in your sewing room, just never used. Brush off the dust and endeavour information technology out again! Every bit we mentioned final calendar week, specialty rulers tin exist fun and easy, only only if you use them regularly enough to remember how they work.
And don't miss the attached videos that demonstrate these aforementioned tools. Sometimes live activeness is simply easier, but you can pick which works improve for y'all.
Fons and Porter Half and Quarter Ruler by Omnigrid
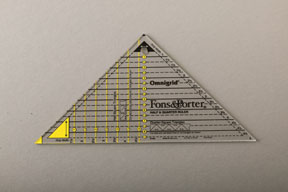

Pros: You don't have to know a magical formula or exercise any math. The little tips will exist pre-trimmed on 1 side and then yous have less trimming to exercise later. This little jewel also makes Quarter Square Triangles, merely that's another lesson.
Cons: Unless yous use it often, or have an excellent retentiveness, it takes a few minutes to orient yourself with how to use this ruler. As in Method One from last week, y'all take a long bias edge that can be accidently stretched out of shape.
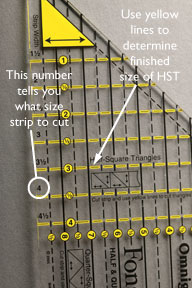
Decide what size finished foursquare yous want. Nosotros'll utilize 3 one/2" finished for this exercise. Finished means the size of the square after it's been completely sewn into a quilt (no raw edges left).
Turn the ruler sideways and then yous can read the instructions for HSTs (without tilting your head), as shown. Look at the yellowish lines that are running left to right – identify the finished measurement you want. We're looking for the yellow iii 1/two" marker for our finished size. Following along that same yellow line, await to the left side of the ruler and y'all'll come across that the strip width needs to be 4" broad.
Using a regular ruler, cut two strips of cloth 4" wide, one of each contrasting color. Layer them rights sides together (RST).
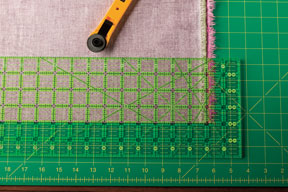
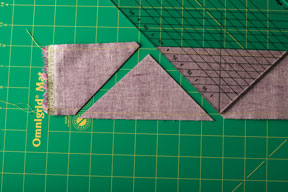
Position the Fons and Porter ruler on the textile for the start cutting, every bit shown. Align it on the yellow 3 i/ii" line. Be certain the little yellow corner spot is hanging over the border of your strip. Cut. For the second cut, reposition the ruler at an opposite angle, as shown, again beingness sure the footling yellow corner tip is hanging over the edge of your strip.

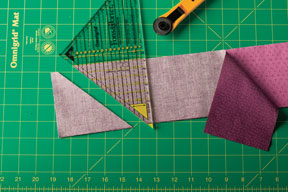
Keeping your triangles in the same position you cut them (RST), stitch on the long edge. Carefully press the seam allowance to the darker fabric. Done! Note that half the triangle is already pre-trimmed for you!

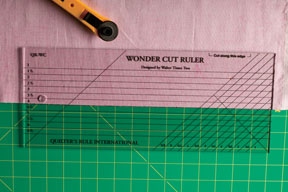
Wonder Cut Ruler
The key to this method is pre-sewing your strips together.
Pros: No worrying nearly raw bias edges – they are sewn in before y'all handle them! You can make a bunch of HSTs without stopping. You don't need a magic formula or do any math. The ruler is long enough that y'all don't need any other rulers to cut your strips in preparation.
Cons: Equally with whatsoever specialty ruler, unless y'all employ it oft, you'll forget how and it takes a few minutes of orienting yourself before you begin.
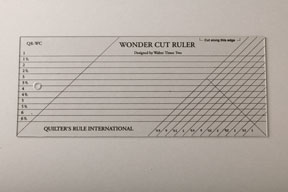
Note, don't endeavor to make any of these steps using a regular ruler. You have to trust the pre-marked lines on the Wonder Cut Ruler. If y'all effort to transfer the logic to a regular ruler, yous'll have a mess…trust us, we tried!
Decide what size you want your unfinished HSTs to be. Unfinished means the triangles are assembled into a square block, but not yet sewn into a quilt, so there are 4 raw edges to your square cake. In our example, nosotros want 3 1/2" finished, and so we demand 4" unfinished.
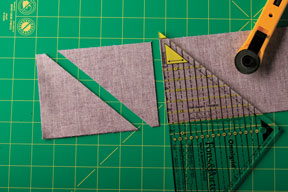
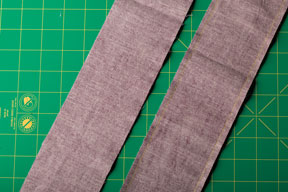
Using the long edge of the Wonder Cutting Ruler, cut a strip of fabric 4" wide. Note the marking on the ruler that says "Cut on This Edge". If you cut both of your contrasting colors at once, layer them RST to save yous a step later.
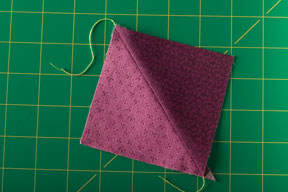
Stitch the strip, like a tube, one/four" seam allowance on each side, every bit shown.

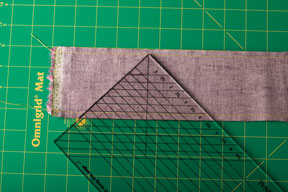
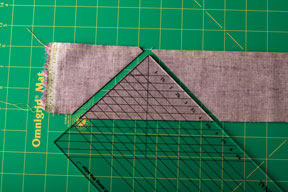
Place the Wonder Cut Ruler on the strip, using the diagonal lines on the ruler. Position the 4" mark on one side of the tube. Note, the tip of the ruler will but come to the other seam and will not accomplish the border of the material. Cut on both sides of the ruler to grade a triangle. Reposition the ruler to the opposite side of the strip. Again, align the diagonal 4" mark along the long border of your strip, only this time, align one side of the ruler to the cut border of the tube. Cut the other side of the triangle. Keep with this method cutting the entire tube. With this size block, you'll go 18 HSTs out of the entire width of fabric! Note, after you cut the starting time ii HSTs, the third one will be pre-trimmed on i corner (an extra bonus)
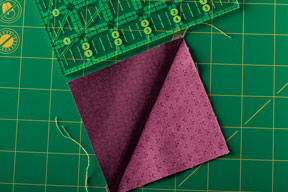
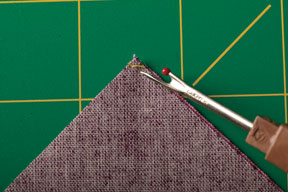
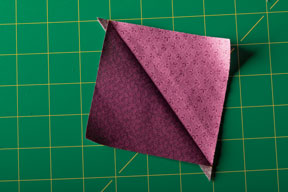
Unfold each square, but watch for a tiny chip of stitching in the tips – if your cut wasn't a perfect 4", or your seams weren't perfect 1/four" seams, you might have a couple of stitches in your tips. No worries! Just gently remove the stitches with a seam ripper (or fifty-fifty just your fingernails). Gently press the seam assart to the darker fabric. Cool, huh?
Triangulations

Pros: Super fast, no math method for making large quantities of HSTs. Since you impress the size yous demand, on need, you don't take to store anything except the software. No complicated executable files to deal with. Just open up the software, find your size and impress. This method is great if you don't trust your ane/four" seams!
Cons: If you don't like ripping paper off your stitching, this is non the technique for you. If you lot're not careful, the ripping procedure could damage some of your stitches.
Permit'southward begin. First, load the CD into your computer. There are no special requirements for this software, because it's only .pdf files, not executable software. For those of y'all that don't speak geek, that just means this is super easy and won't take any thinking or special steps. Most computers already have Adobe Reader and that'due south all you need. So, load the CD and open up the option called One-half Square Triangles.


Offset you'll run into very detailed instructions with excellent photos. You'll also run across a comprehensive list of all the sizes of triangles that Brenda provides. Scroll downwards to the size of Finished HST y'all want and print that folio on your dwelling house printer. Print equally many copies as yous demand. Nosotros used regular printer newspaper. We're making one ane/ii" HSTs and that item folio fits 24 HSTs!

Allow's have a look at the printed sheet now. It's full of information, but not in a disruptive style. Here'southward what's included:
- What "Finished" size you will get from this folio.
- What size the paper pattern should measure, to exist sure your printer didn't shrink or enlarge it....you should definitely do this! It tells you exactly what size the outside lines of the page should measure, and ours was exact without making any printer modifications.
- How many HSTs y'all'll get from this folio, and so you'll know if y'all demand to impress more than.
- Now, notice there are dotted lines and solid lines. We'll be sewing on the dotted lines, so cutting on the solid lines. More on that in a moment.

Next, cut two pieces of contrasting fabrics approximately the size of the paper design. In our example, we cut larger than the newspaper so y'all could see it, merely yous tin can salvage fabric and cut it just 1/4" larger than the outer lines. Right Sides Together (RST), layer the 2 pieces with the lighter side on pinnacle. You'll encounter why after. Add together the newspaper pattern on elevation and pin. Place the pins strategically then they are not in the way of the dotted lines, so y'all won't have to move them when you begin stitching.

Now you stitch. Prepare your sewing machine stitch to a smaller stitch. Brenda suggests 18-xx stitches per inch. Our machine was digital and we set it to 1.5. She also suggests using a size xiv sewing machine needle. Both the thicker needle and the smaller run up size will help perforate the newspaper so it will tear off more easily, much like when you lot foundation paper piece. Find all the dotted lines on the paper pattern are continuous! Yous simply keep on stitching the entire page, stitching correct on the dotted lines.

Now you cutting. Keep in mind y'all're cutting through both paper and fabric, so you might want to utilise a rotary bract designated for newspaper only. We cut through the longer solid lines offset, and so trimmed the piffling corners off second. Information technology goes really fast and looks like this:

Fourth dimension to fix our blocks for ripping off the paper. Notice the newspaper is however attached, and is on the light fabric (because of our careful planning in the first). Lay the block newspaper side down and finger press the seam open. Notice the bias is protected because the paper is holding the light side steady. Brenda suggests "aggressively" finger pressing, using either your thumbnail or a finger presser, just does not employ an atomic number 26 at this betoken because the inkjet letters on the paper could run.


Time to rip! Hold one pollex firmly over the centre of stitching. This is to protect the bias and the stitching when you tug. Now tug the paper firmly, starting from the center and working your way out. This too protects the stitches at each end from coming undone.


Finish ripping off the slim section of paper, once again starting from the eye and working your mode out. Ta Dah! This makes smashing Idiot box work. Do all your stitching, so pop in a skilful movie and rip away!


June Tailor's Perfect One-half Foursquare and Quarter Foursquare Triangles Ruler
Pros: This ruler takes you through all the steps to making HSTs and Quarter Square blocks. It also works very well if yous like to brand your HSTs oversized and trim them down. The center department has a nice squaring up feature that helps you make your HSTs perfectly square. This method is nifty if you lot don't trust your 1/iv" seams!
Cons: You still have to do a trivial math to determine what size to cutting your fabric initially.
Get-go, lets take a piffling tour of the ruler. Looking at the photo below, see the far left side has an open space to marking your i/four" stitching lines. The far correct side has a cut guide for your rotary cutter to cutting the square in one-half. And the center department allows you to square up your HST perfectly.

Start with the size square you want. The complete instructions included with the ruler remind you of the special HST formula. For an unfinished HST that measures 3", you'll cut these two squares at iii seven/eight" square. Cut two of contrasting fabrics and layer them Right Sides Together (RST).

Lay the ruler on top of the lighter textile. Using a fine mark, depict downwards both sides of the opening. This gives you perfectlyl spaced stitching lines.

That expect like this:

Sew on both lines till it looks similar this:

Layer the Perfect ruler on the block, this time using the cutting guides on the correct side of the ruler. The dotted lines of the ruler lay on top of your stitched lines of the block, assuasive the cutting guide to be perfectly poised for your cut. Make the cutting and you'll have two HSTs. Carefully press open.

If y'all've ever fabricated HSTs, you know they simply don't turn out exactly square. Fabric is flexible and has a life of it's own. Using the center section of the Perfect ruler to square up your block volition ensure it's ready for piecing into your quilt. Use the guides to lay your block under the ruler. Find the cut guide and using your rotary cutter, trim up whatsoever little bits that keep your block from existence perfect. Nosotros just had teeny tiny $.25, but it made a difference. This step too cuts off those petty ears that arrive your mode afterward. After you lot cut, rotate your block to trim upwards the other ii sides.


A perfect One-half Foursquare Triangle block!

Quilting for Baby Girl Quilt Made From Half Square Triangles
Source: https://www.connectingthreads.com/tutorials/t/half-square-triangles-specialty-tools/6
0 Response to "Quilting for Baby Girl Quilt Made From Half Square Triangles"
Post a Comment